05 Feb Configuring Azure AD authentication with AudioCodes SmartTAP 360
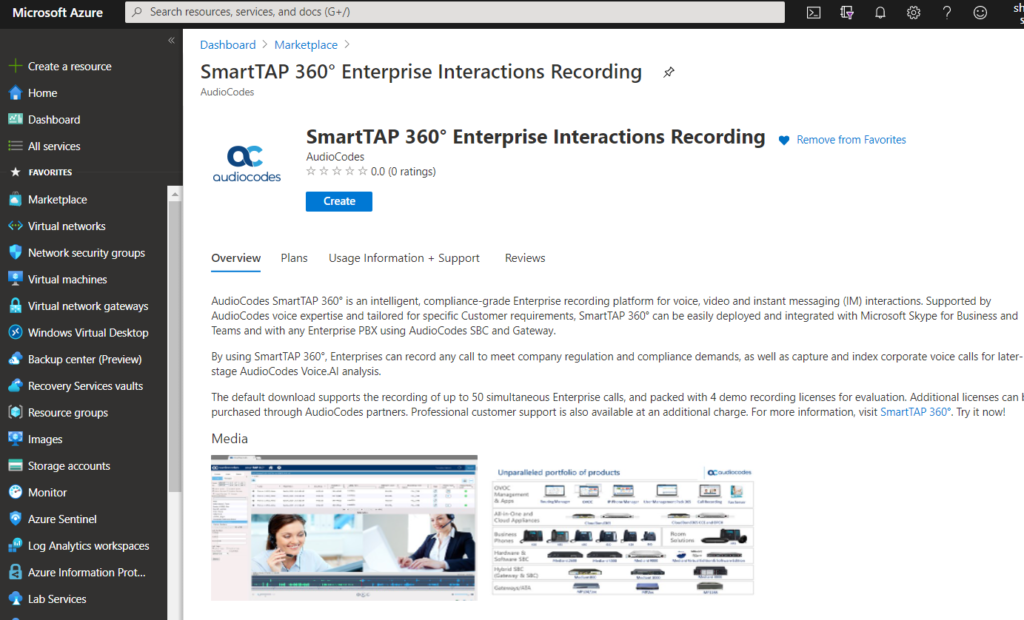
Available on the Microsoft Azure Marketplace, AudioCodes SmartTAP 360° is a compliance call recording solution for recording Microsoft Teams voice, video and instant messaging (IM) interactions.
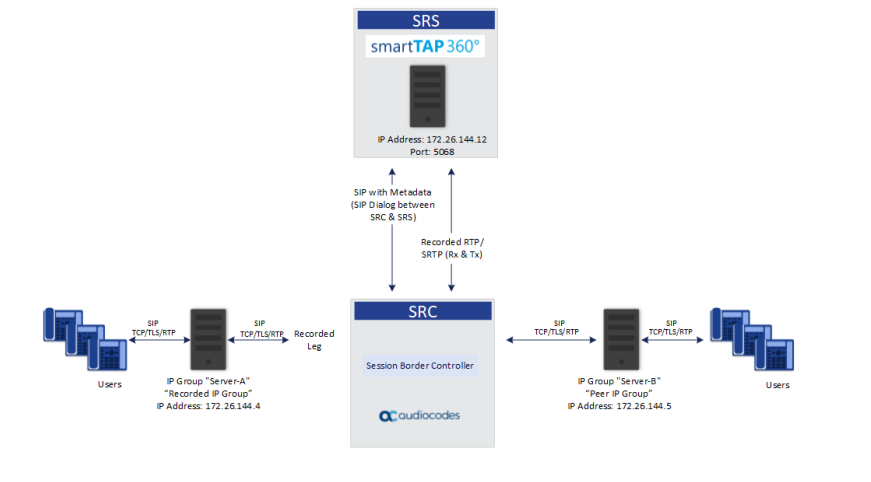
SmartTAP can also be deployed and integrated with Skype for Business, or any enterprise PBX when connected to an AudioCodes SBC when using the SIPREC protocol to record PSTN calls. This allows enterprises to capture and index corporate voice calls for later analysis, while addressing regulatory compliance requirements.
SmartTAP Features:
- Fully compatible and seamlessly integrated to any Skype for Business deployment type and SIPRec based recording
- Support for multiple call types including internal calls, mobile calls, calls with remote users and federated users
- Registered enterprise users and external entities recorded under any call scenario
- Connect to conference servers, edge, front-end servers and more using the SmartTAP components and plugins
- Recordings data stored on premise or cloud-based
- Microsoft Teams recording via Direct Routing calls routed through AudioCodes SBC
The Azure market place version of SmartTap supports recording of up to 50 concurrent calls, and supports 4 demo recording licenses for evaluation.
As SmartTAP runs on top of Windows Server it can be installed where you like, EG on-premises, in a Public Cloud, Private Cloud and so on. For the purposes of this post i will be using a SmartTAP instance running in Microsoft Azure. Placing your SmartTAP in Azure is also a good idea as it allows the compliance recordings and media call flow to be as close to the Microsoft Teams service as possible – assuming of course that your SBC in Azure too!
I wont be covering the SmartTAP installation in this blog post as that is pretty straight forward. The aim of this post though is to demonstrate how to:
- Configure synchronisation of Azure AD (AAD) identity’s into SmartTAP and subsequently enabling them as administrators that can login to the SmartTAP portal and administer the service.
- Enable SSO for AAD identity’s so admins can login to SmartTAP using their AAD credentials.
In my opinion its always a good best practice to leverage your existing identity management solution where possible, be that Active Directory or Azure Active Directory rather than using local accounts, as this allows for a securer and consistent enforcement of authorisation and authentication controls, as well as providing an audit trail to ensure organisational compliance.
As authentication in this instance is handed off to AAD, if you’re using Password-Less Authentication, Multi-factor authentication or even Conditional Access, those controls will still be enforced for all administrative SmartTAP logins thus preventing the need for standalone local accounts that can be harder to centrally audit and administer.
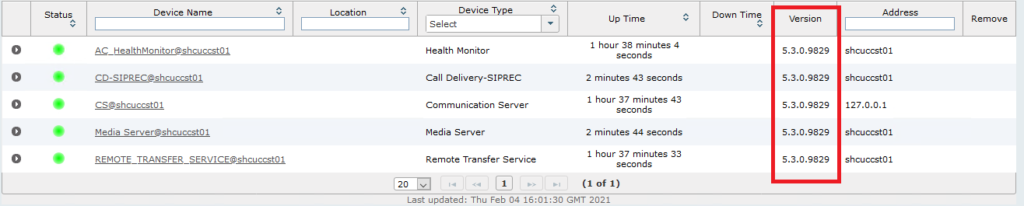
Step 1 – Ensure you’re running the latest version of SmartTAP
After installing SmartTAP ensure you are running version 5.3.0.9829. I’ve found previous versions lower than 5.3 haven’t supported URL redirection properly which resulted in authentication failure. So ensure you are running 5.3.0.9829 before proceeding.
Login using an admin account and browse to System > Managed Devices. Note the default admin user account and password is “admin” – password “admin”.
Step 2 – Configure Azure AD permissions
Two app registrations need to be created:
- To provide read access to your AAD identitys to administrators can login using their AAD credentials.
- To provide read access to AAD for users and groups in your tenant.
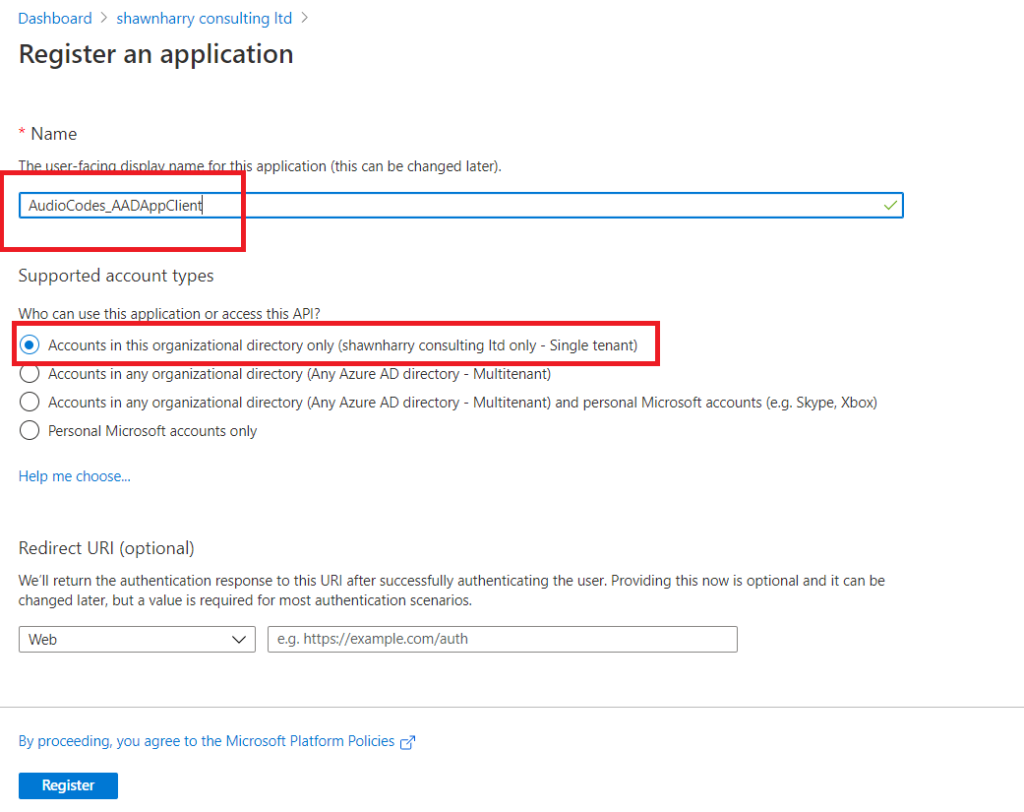
1) Login to the Azure Portal and create a new App Registration. Browse to Azure Active Directory > App Registrations > New Registration. This account will be used later on in this post to configure SmartTAP so that AAD identity’s can be used to authenticate to SmartTAP.
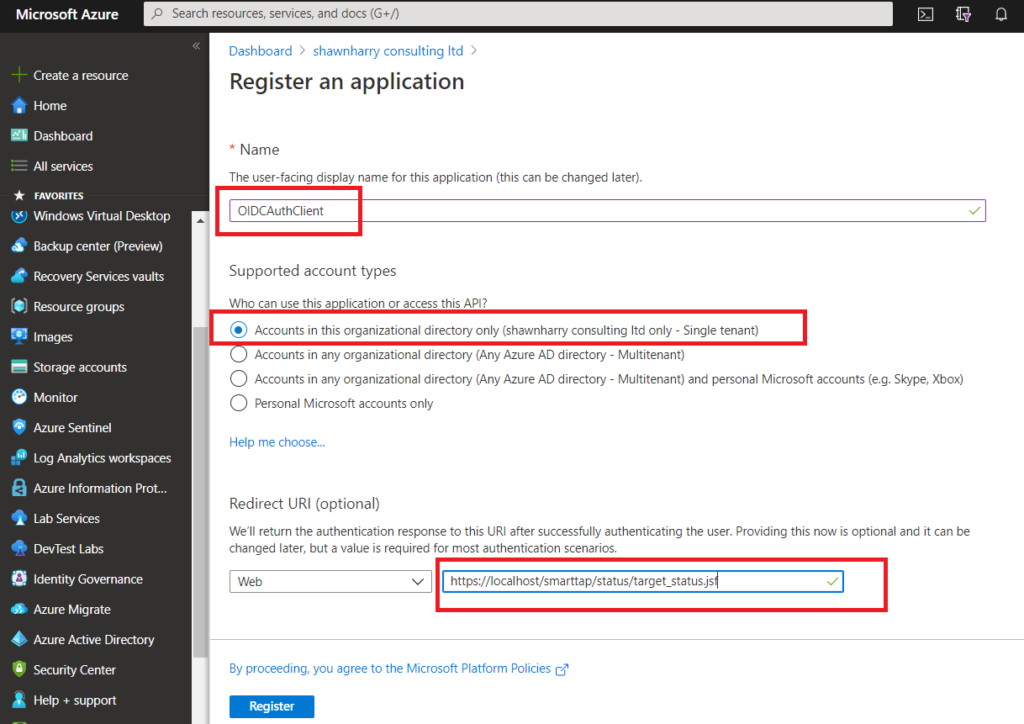
Give the new registration a name and ensure Single Tenant is selected. The redirect URI needs to be “https://localhost/smarttap/status/target_status.jsf”. This ensures that after you’ve successfully authenticated with AAD your login is redirected back to the SmartTAP portal.
The default SmartTAP installation in Azure will enable HTTPS by default so ensure HTTPS is included in the redirect URI. If you enter HTTP instead you’ll experience authentication failure.
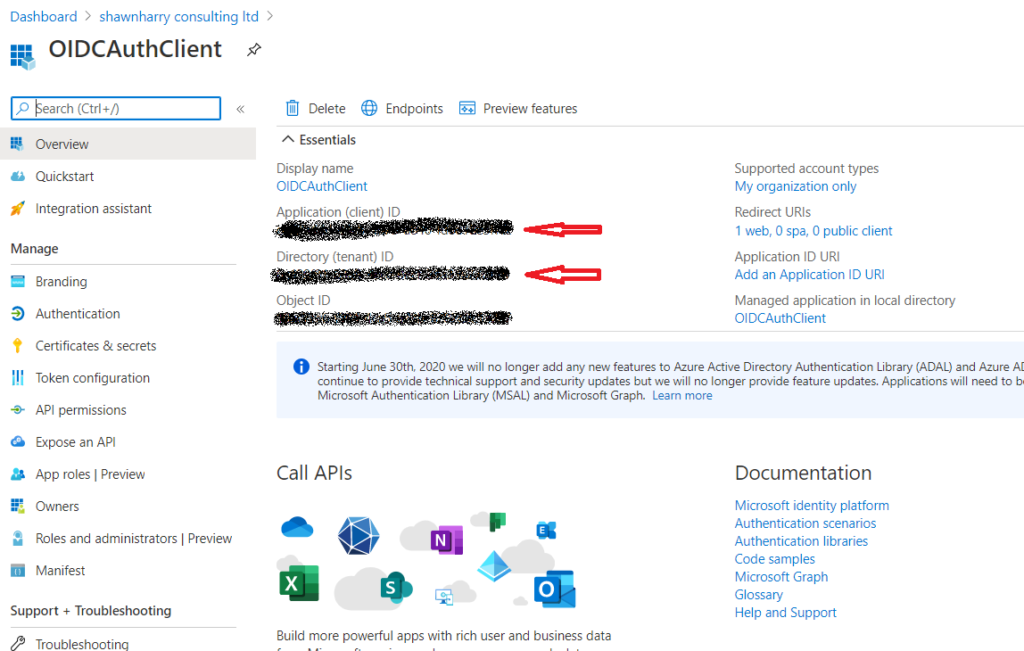
Make a note of the Application ID and the Directory (tenant ID) as these will be needed later to configure SmartTAP to communicate with your AAD tenant.
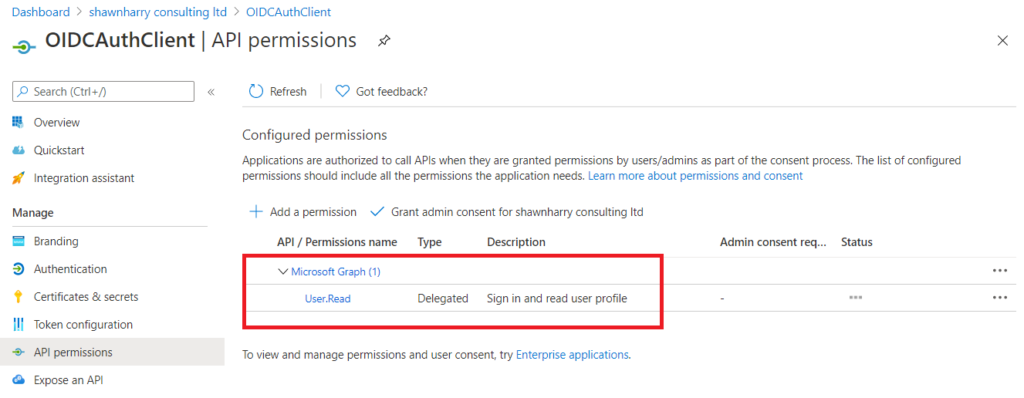
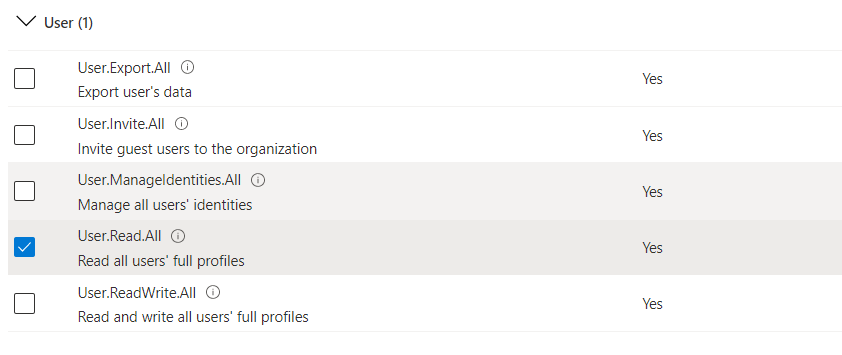
SmartTAP uses the Microsoft Graph API to communicate with AAD. These permissions should already be set on the new app registration. But if they’re not select API Permissions > Add A Permission > Microsoft API > Microsoft Graph > Delegated Permission. In the Select Permissions pane type User and ensure the read permissions are the same as below.
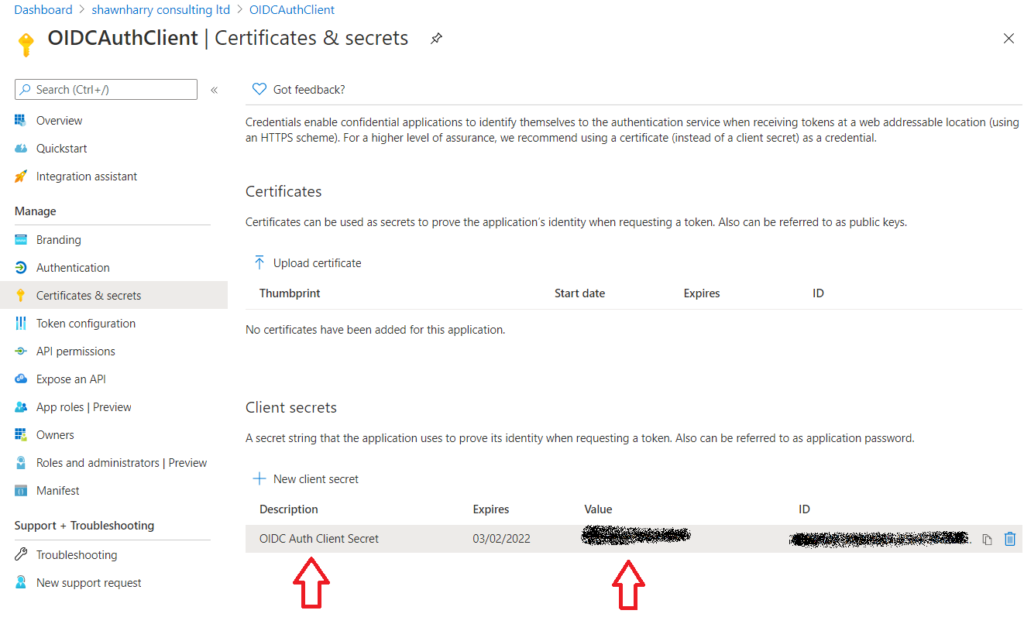
We now need to create a password so that the App Registration can be used in SmartTAP to authenticate against your tenant. Browse to Certificates & Secrets > New Client Secret. Give the new secret a description and specify the number of years you want this secret to be valid for and click Add.
Make a note of the client secret.
Note: The client secret is only available during creation. When accessing the App Registration at a later date the secret will be obfuscated so ensure you have the secret noted down otherwise you’ll need create a new secret.
2) Go back to App Registrations and register a new application. This registration will be used so that SmartTAP can access AAD Users and Groups in your tenant. Enter a name and ensure Single Tenant is selected. The Redirect URI can be left empty this time.
Make a note of the Application ID.
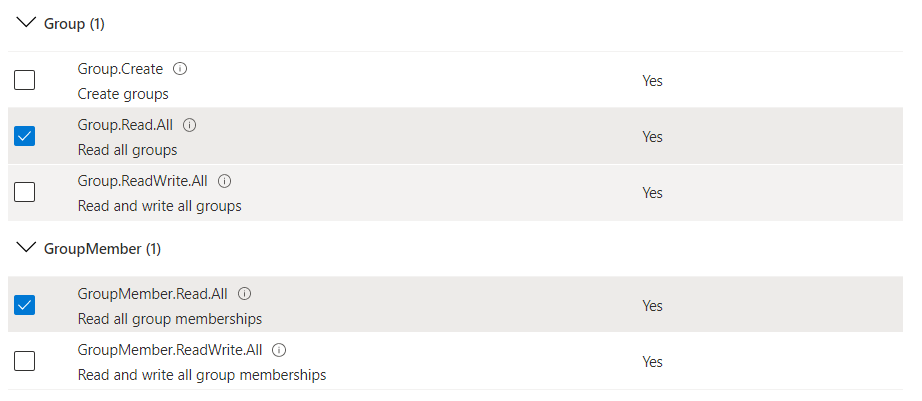
Note: The Directory (Tenant) ID from the previous step will be used to configure SmartTAP. Browse to API permissions > Add Permissions > Microsoft APIs > Microsoft Graph > Application Permissions.
The Group and User permissions must be configured the same as below:
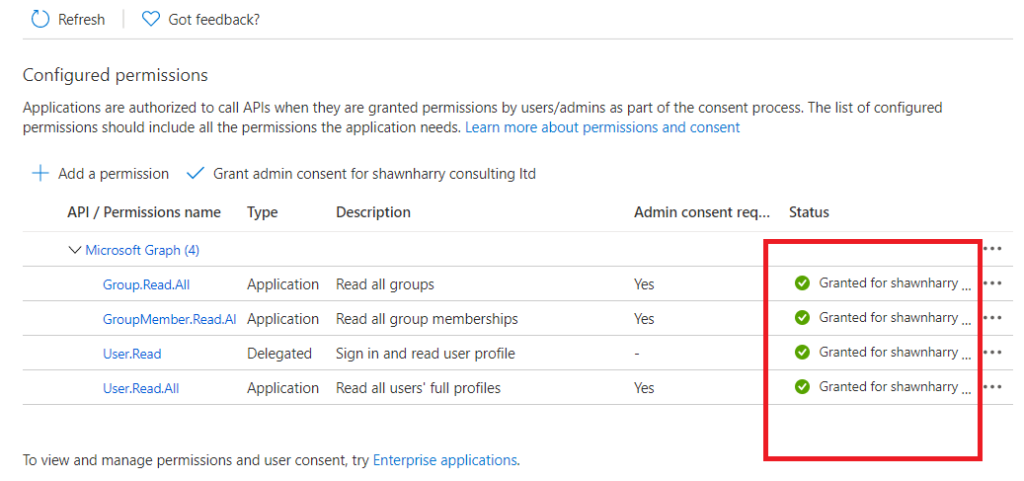
Grant Admin Consent for your organisation.

Once consent is granted you should see green checks against the assigned permissions.
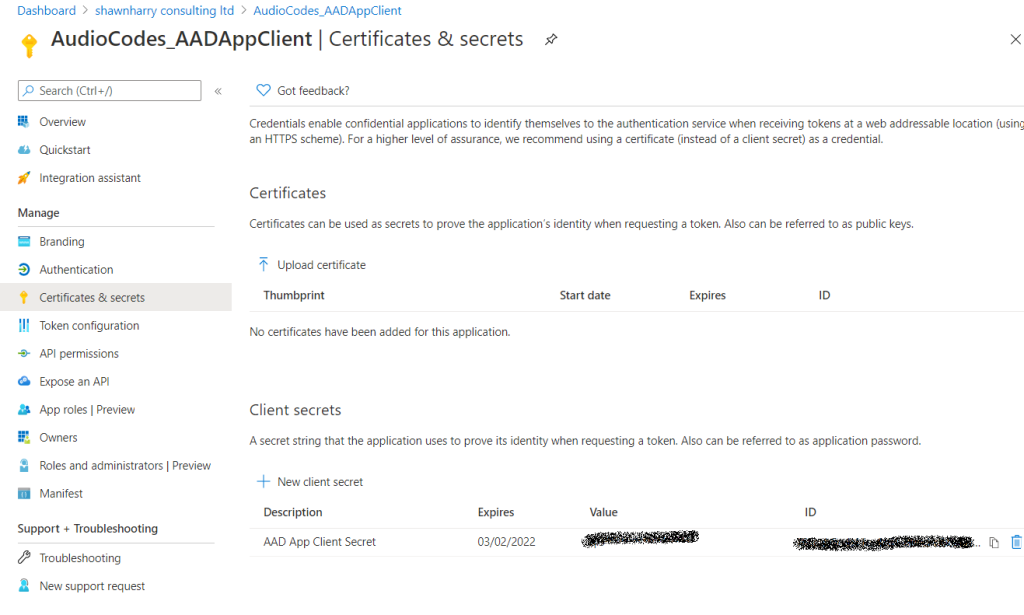
Same as previously the new App Registration needs a password or Client Secret. Select Certificates & Secrets > New Client Secret. Enter a description and choose the expiration date. As this is a lab I’ve enabled mine for a year but for a production deployment its recommended that expiration is set to never.
Make a note of the client secret.
Step 3 – Configure SmartTAP
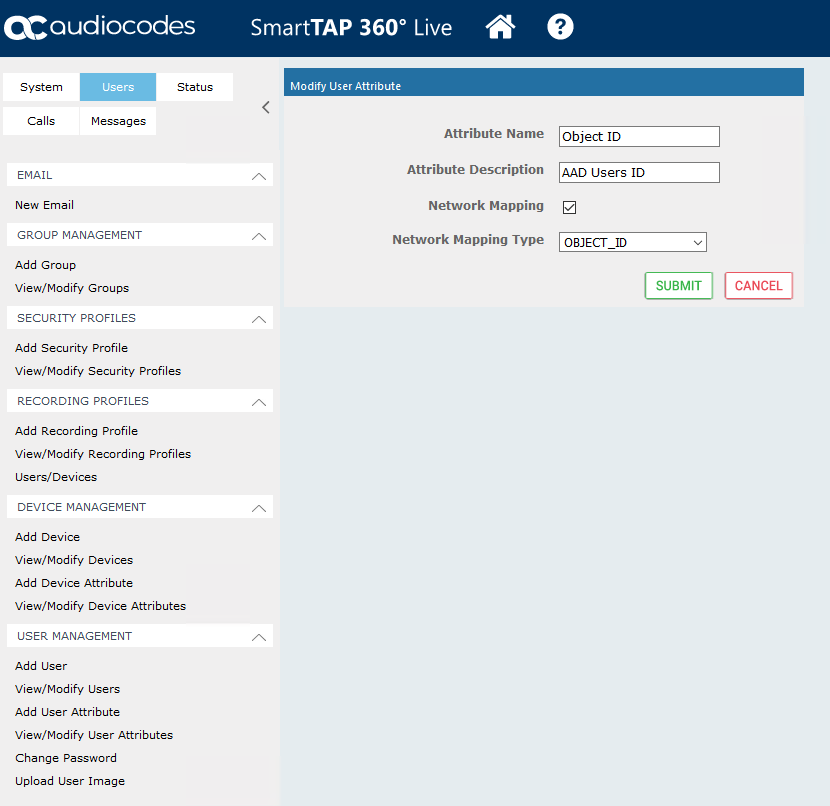
Before AAD users can be add to SmartTAP a custom attribute must be used for mapping the object ID of a Microsoft Teams user to an AAD attribute.
Login to the SmartTAP portal Users > User Management > Add User Attribute. Enter an attribute name and description and ensure the Network Mapping Type is the “Object ID”. Click Submit.
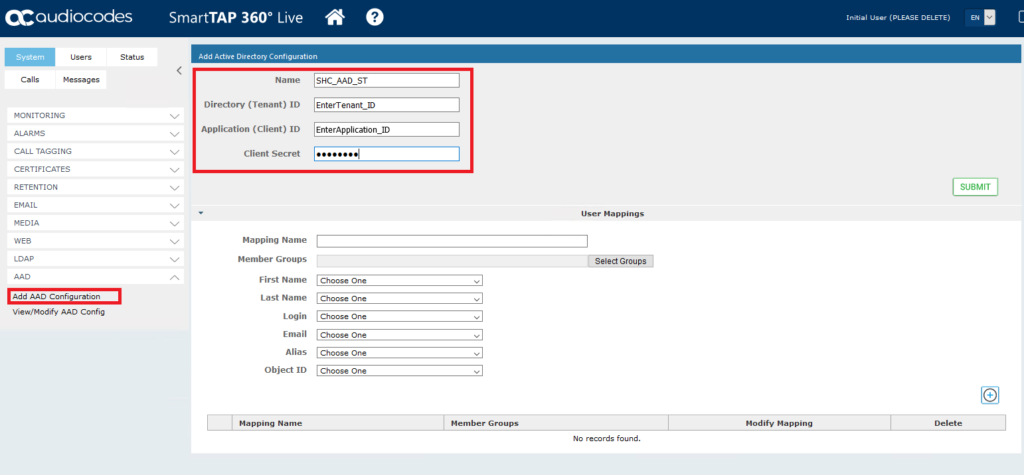
Browse to System > AAD > Add AAD Configuration. Enter a name along with the Directory Tenant ID, Application ID and the Client Secret recorded in the previous section. After clicking submit you should see the configuration saved successfully.
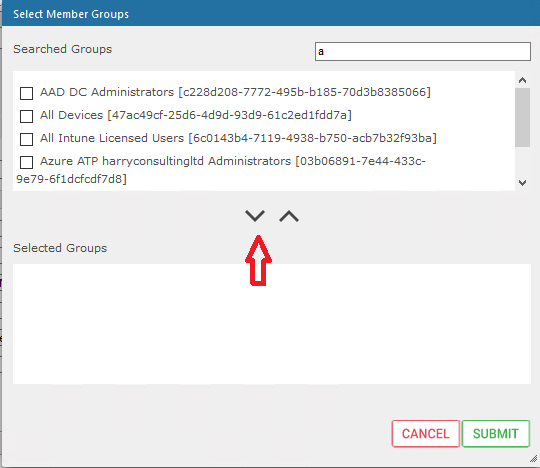
This step allows you to map a group of users to SmartTAP so that we can assign them permissions to login as Administrators to the SmartTAP portal. Enter a mapping name and then Select Groups. Type the beginning name of a an existing AAD security group and you should see the Searched Groups populated. Select the group via the tick box on the left and then use the chevron below to add the Selected Group.
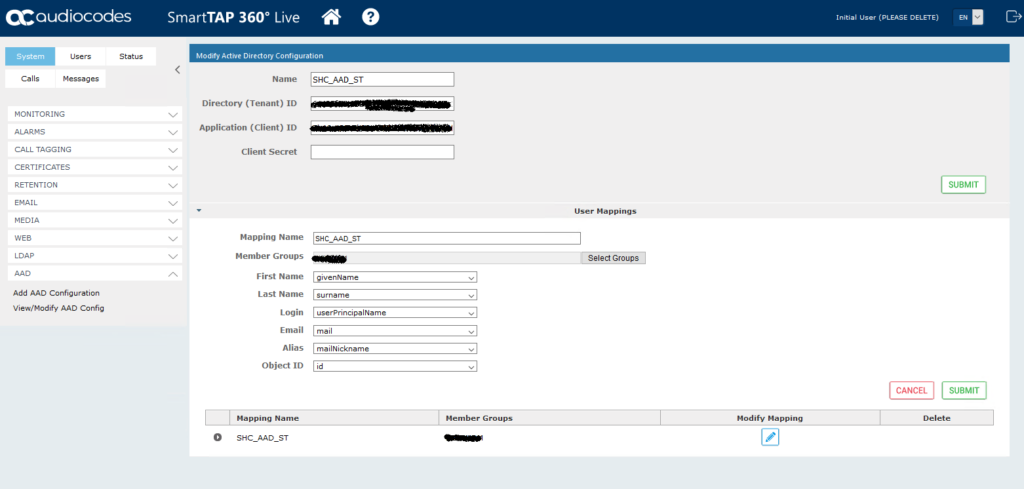
Now enter the attributes in the image below and then click the + sign to add the mapping and you should see a notification in the top left that the mapping was successfully added.
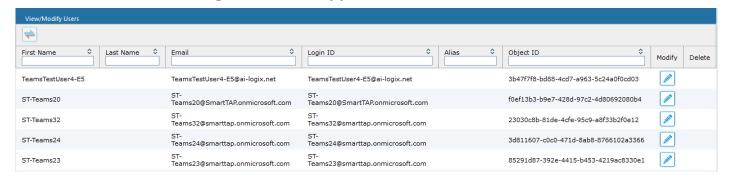
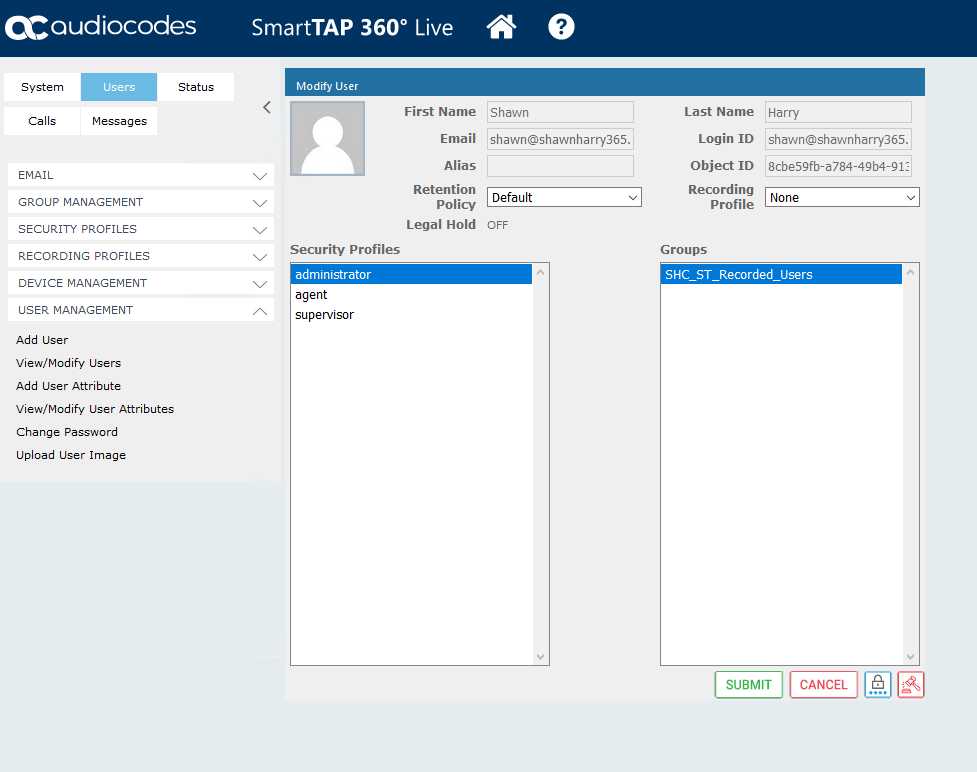
Browse to Users > View/Modify Users and you should see the list of users you just added. Click on modify on an account you’d like to grant administrator rights to login.
From Security Profiles select Administrator and then submit.
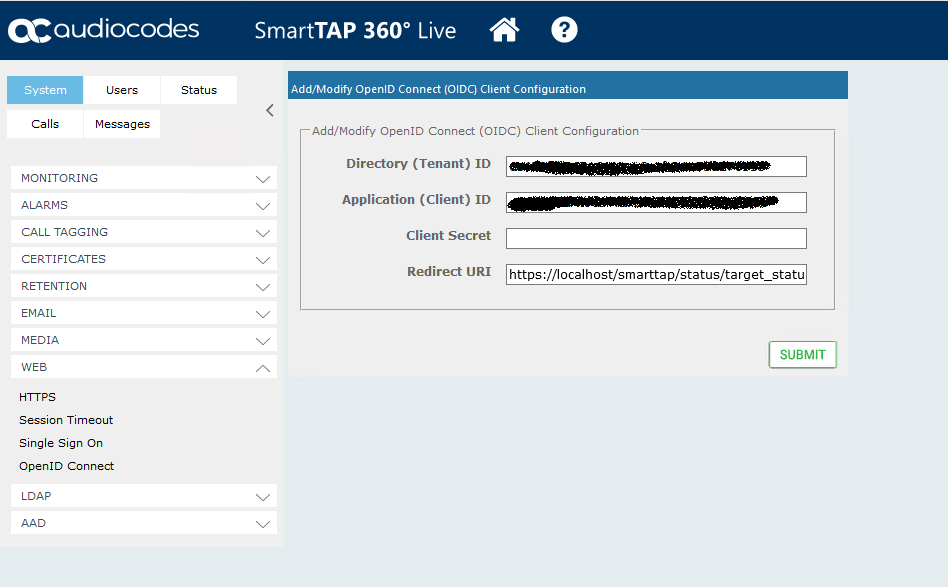
Browse to System > Web > OpenID Connect. Enter the Directory and Application ID for the OIDC connection along with the client secret and redirect URI and hit submit.
Step 4 – Login to SmartTAP with your AAD credentials
Log out of the SmartTAP portal and you should now see a Sign In with Microsoft 365 radio button.
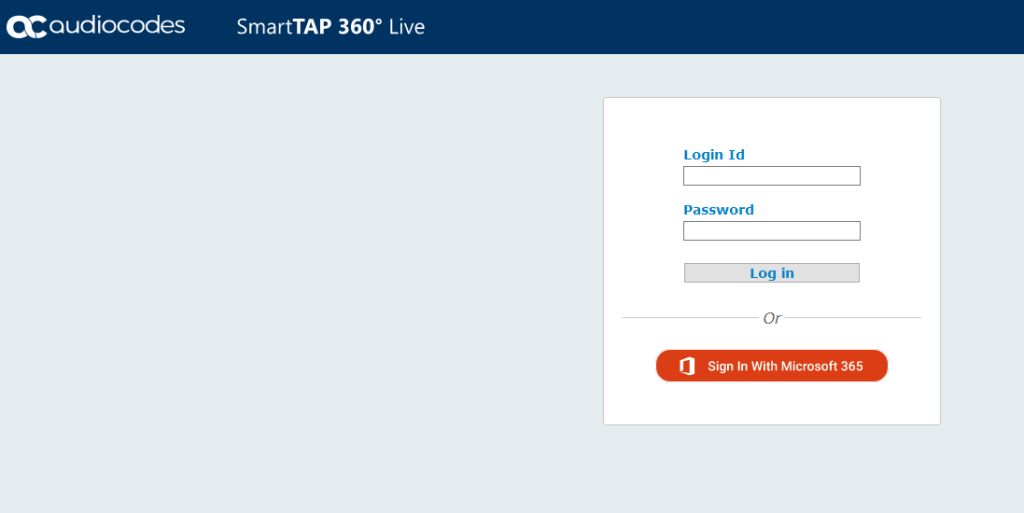
Click sign in and enter your AAD credentials.
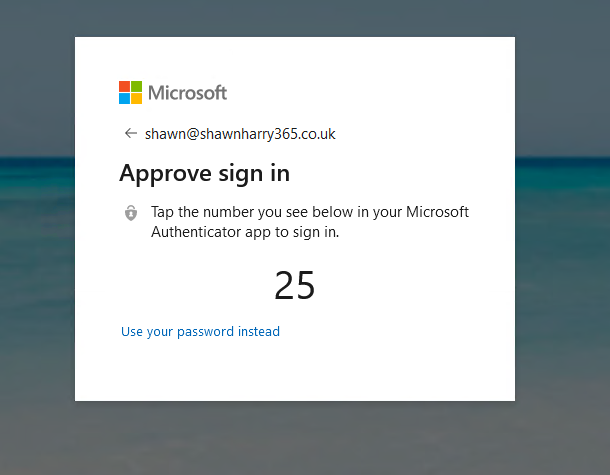
With authentication handed off to AAD my Password-Less authentication configuration is enforced and I’m logged into SmartTAP with my AAD credentials!

Pingback:Shawn Harry | Configuring SIPREC for Microsoft Teams Direct Routing with SmartTAP
Posted at 15:38h, 13 February[…] In my case my users are being imported from AzureAD. See blog post here. […]